
Are you having fun learning Scenes in Tasker as you follow along our Android customization series? We sure are. Last week we created a little message board that takes your picture, this week we’re taking greater control of our SMS text messaging, creating a delayed sending tool to schedule messages to send at a later time.
The idea and project is simple and fairly rudimentary, please do not expect a full fledged messaging app here today, although you could build one using Tasker, if you really wanted. No, we’re going to just accept a phone number, a message and an amount of time to delay before actually sending the message. No bells, no whistles, one message at a time.
Before we begin
Tasker – Google Play StoreDo you know what you’ll need before we begin? Of course you do, a modern Android device with Tasker installed. Tasker is $2.99 in the Google Play Store.
As has been true of many of our projects, there is an app for that. There are many great SMS apps out there that can help you schedule SMS delivery, most of which operate as proper messaging apps. That’s not our goal, we want to continue learning the Scenes tool in Tasker, the skill you learn today can be put to use on many other projects to satisfy many other automation and customization actions on your device.
Fair warning, this project is not perfect – focusing on brevity, it was designed to send only one message at a time. Attempting to send multiple messages will either not work, or will result in errors. This can be fixed, but we will not be fixing it today.
Schedule delayed SMS messages
As mentioned, this is going to be pretty quick and dirty. We will be learning the TextEdit, Number Picker and Button elements of Tasker Scenes, then, of course, we’ll look again at how to send an SMS with Tasker.
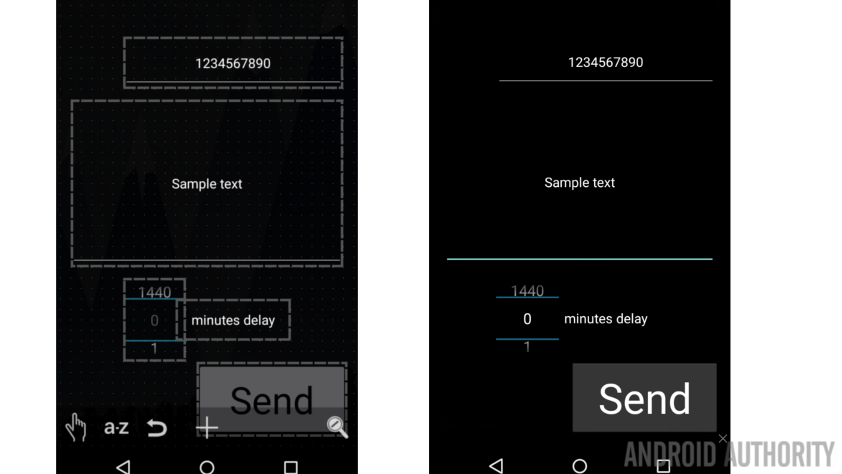
Let’s start off with design. I am going to create a full screen Scene with full black background, it’s just easier to isolate things for my screenshots that way. You may opt for other colors, different opacity values and even use images for a background to this Scene.
I will then place two TextEdit elements, one to collect a phone number, the other to collect your message, a Number Picker to set the amount of time to delay the message and a button to send.
Let’s get started.
Head into Tasker, move over to the Scenes tab and start a new Scene.

I’ll call mine “DelayedSMSScreen“.
Re-size your active area, hit the menu button in the top right to get into Preferences to set your background and more. Head back to our previous Tasker Scenes projects for more details on that.
When you are happy with the window area, tap that magnifying glass with the “x” in it, located in the bottom right corner.
Long press the display or tap the “+” button to add an element.

Choose TextEdit.
Give it an appropriate Name, I’ll call mine “txtPhoneNumber“.
You can adjust the design settings later, for now, scroll all the way to the bottom and change two settings:
Input Type can change from “Normal Text” to “Phone Number.”
Then, Maximum Characters can be reduced from Unlimited to just 10. (If you frequently SMS to long distance locations, or live in an area that follows a different phone number format, please adjust the maximum characters to an appropriate level for your needs. You can even leave it on Unlimited, you’ll just have to be careful to properly input the phone number when you finally use this tool.)
Tap the system Back button to save and exit back to the design mode. You’ll need to do some dragging and dropping to re-size and re-position, you might even have to tap back in to adjust font size and color. You’ll figure it out.
Time to create another TextEdit element. Repeat the steps above with the following exceptions:

Name it something like “txtSMSMessage“.
Change the Maximum Characters to 140, or 160, whichever your provider allows.
When adjusting the design of this element, leave it large enough to fit all of your text. Fill the Text section with sample text if you need to test.

Now we need to add the delay tool.
Long press or tap the “+” button to add a Number Picker to your Scene.

Give it a Name, something like “npDelay“.
Make sure Min is set to 0.
Change Max to a value like 1440, which is the number of minutes in a day. You’ll have to choose what maximum value you want here, I am going to use this number to designate how many minutes to delay in sending the SMS, you can adjust yours to count in seconds, hours or more, just make sure your Max value fits accordingly.
You could even add several Number Pickers, one for seconds, one for minutes, one for hours and so forth. I’ll leave that to you for today.
Set Default to whatever value you desire, I’ll set mine to 0, meaning the message will send immediately if I forget to adjust later.
Finally, and this is just a design decision, I like to have Wrap Around turned on, this makes it easy to jump to your Max value in the Number Picker.
Hit that system Back button to save and exit.
Re-size and re-position as desired. I placed mine with room to the right of it to add a Text element that reminds me that the Number Picker is choosing how many minutes to delay the SMS.
Last, we need to add that crucial action item, the button.
Long press or tap the “+” button and add a Button.

Name it something like “btnSendSMS“.
Enter the Label as “Send“.
Hit that system Back button to save and exit.
Adjust the button to fit your design. Don’t hesitate to tap back into it to adjust color and font settings.
Good work, you now have the design out of the way, let’s build the functions.
Setup variables and a Task
We are not going to be doing anything overly complicated here, but we will need to bounce around just a little bit as we go. Namely, we need to add functionality to the TextEdit and Number Picker elements, then we have to bounce over and build a new Task, and then we bounce back to finish the scene.
Don’t worry, it’s pretty easy.
Tap into your “txtPhoneNumber“ text box.
Head to the Text Changed tab.
Tap the “+” button to add an action.

Choose Variables.
Choose Variable Set.
Under Name, enter “%SMSNUMBER“.
Set it To “%new_val“.
If you recall from last week, this pulls the newest value from the element you are acting upon, thus, it will save the phone number that you type in to this new variable.
Tap the system Back button to save and exit, and Back again to exit editing this text box.
Tap into your “txtSMSMessage” text box.
As before, head over to the Text Changed tab.
Follow the same steps to create a variable here as well.

Call the variable “%SMSMESSAGE” and also set it To: “%new_val“.
Hit the Back button to exit out of this text box as well.
Tap into your “npDelay” Number Picker element.
Head into the Value Selected tab.

Guess what? Time to build another variable. This one will be called “%SMSDELAY” and will also have value set To: “%new_val“.
Save and exit out.
Before we can continue in the Scene, we need to go create that Task now.
How to send an SMS with Tasker
If you have not done so already, please back all the way out of your new Scene created above and head to the Tasks tab of Tasker. We have to build a new Task from scratch before we continue.
Tap the “+” button to add a new Task, name it something like “SendSMS“.
Tap the “+” button again to add an action.

Select Phone.
Select Send SMS.
Under Number simply enter our variable set above, which was “%SMSNUMBER“.
Then, set Message to be your “%SMSMESSAGE” variable.
That’s actually all we need to do here, hit that Back button to save and exit out.
Head back your Scenes to continue.
Create a delay before sending the SMS
Once back into your “DelayedSMSScreen” Scene, tap your Send button to continue.
Head over to the Tap tab.
For the moment, I will strip away all of the embellishments, we’ll just get the job done.
Tap the “+” button to add an action.

Select Task.
Select Wait.
Beside the time value that you are delaying your message, mine will be Minutes, tap the crossing arrows icon.
Now, instead of entering a specific number, enter your delay variable, mine was called “%SMSDELAY“.
Tap the system Back button to save.
Now, tap the “+” button again to add your last action.

Choose Task.
Choose Perform Task.
Tap the magnifying glass to the right of Name and find your “SendSMS” Task that you created above.

Tap that system Back button to save and exit all the way out of the Scene. You are almost done.
Don’t forget to start your Scene
Although you are finished building your project, you’ll still need to build a dedicated Task to start the Scene. If you remember how to do this from last week, do so and skip ahead to the next section.
Create a new Task.

Add an action. Choose Scene. Choose Show Scene. Select your new “DelayedSMSScreen” Scene and decide how you want it to display. I am opting for “Activity, Full Window, no Bar” just like I did last week.
Now go ahead and decide how to actually run this Task. There is that play button in the bottom left, or add an icon and then add a Tasker Task shortcut to your Homescreen.
That is it. Give your project a run for its money. I highly recommend sending yourself a test message, have it deliver in a minute or two and see how it goes.

Bottom line, you may now enter a phone number, enter a message, choose a delay time and fire it off. Wooohoooo!
What’s next
Did you notice a few glaring issues with the project? I hope so, and a couple of them can be a big issue for you, please read on.
First, who wants to manually type in a phone number, why can’t we add a button that allows us to pull numbers from our Contacts? In short, you can absolutely do this. I may never get around to showing you how, but Tasker is capable. Time for some research.
Next, despite the fact that I built the project to send an SMS up to 24 hours from now, I recommend keeping the times fairly short. Particularly, we have built this project so that the Scene handles the delay and triggers the sending of the message. Should your device reboot, or the Scene/Tasker be closed before the message sends, it may never go. Please remember we are learning the tools here today, not building a bullet proof SMS app.
Warning! What happens if I want to send multiple messages? Please be careful here. The way we have built this project, the SMS will send with the absolute last saved variables. This means that if you fire off a message, but then change the phone number or message before the message actually delivers, the new info will be used when the message is sent. This could be a huge problem with majorly unintended message deliveries. See what I mean below, I changed the message but not the number, this is what happens.

Before I send, can I confirm my action? Ah yes, making your project a little more user friendly, I like it. Try adding a new Scene, or an Alert Popup, that gives you a visual confirmation of your intended message and provides a button to cancel the message. You’ll need to use some variables and expand the button click actions with an exit strategy.
Also, I recommend adding an Alert -> Flash message, if nothing else, telling you when the message sends. You’ll have to have device in hand to see it, but it is at least great for testing.
Again, please remember to use this project as a learning tool, please do not depend on it to deliver SMS messages. It will work, sure, but thee is a long way to go before it becomes a secure and bulletproof messaging app.
Next week
I hope you learned a few new tricks in our Android customization project today. The ability to delay an SMS before sending it can be extremely handy, but the tools we learned can be even handier for other projects. Let’s shift gears a little next week, we want to build a voice reminder, you know, like how you can tell Google Now to “remind me in two hours to go to bed” – yes, let’s use Tasker to build that.
Thank you again for following along, what projects do you have in mind with your new found Tasker Scenes knowledge?